> ## Documentation Index
> Fetch the complete documentation index at: https://docs.reactor.inc/llms.txt
> Use this file to discover all available pages before exploring further.
# Session Recording
> Capture clips and full session recordings without writing any model code.
Reactor can record every session your model serves and hand clients a downloadable, replayable MP4
of it. You don't write any recording code. You flip one flag in `reactor.yaml`, and the runtime
hooks the same frames your model is already emitting, encodes them in the background, and exposes a
clip API to clients.
## Enabling recording
A single line in `reactor.yaml` turns the recorder on:
```yaml reactor.yaml theme={"theme":{"light":"github-light","dark":"github-dark-high-contrast"}}
model:
name: my-model
runtime:
import: model:MyModel
config: config.yaml
recording:
enabled: true
```
No changes to your model class. The runtime taps the same frames it delivers to the wire, so
everything your model emits ends up in the recording too.
That covers the common case. The rest of this page documents the knobs available when you need them,
and how to verify the recording works once you've turned it on.
## What gets recorded
The recorder consumes one **video** track and (optionally) one **audio** track from your model's
`Output`. With a single-track model the runtime picks them automatically. With multiple tracks of
the same kind, name the ones you want:
```yaml reactor.yaml theme={"theme":{"light":"github-light","dark":"github-dark-high-contrast"}}
recording:
enabled: true
video_track: main_video # required when the model exposes >1 video track
audio_track: main_audio # required when the model exposes >1 audio track
```
The recording timeline advances with the media your model produces, not with the clock. A model that
goes idle between frames stops the timeline rather than recording dead air, so a clip covers the
frames that existed and a session with long pauses records shorter than the wall-clock time it
lasted.
`self.output.flush()` cuts live playout to black, and the recording keeps running across it, so a
clip spanning a reset contains both sides of it.
## Configuration reference
Every field has a sensible default. Override only what you need.
```yaml reactor.yaml theme={"theme":{"light":"github-light","dark":"github-dark-high-contrast"}}
recording:
enabled: true # default: false. Recorder is opt-in.
chunk_seconds: 4 # rolling fMP4 chunk length on disk
clip_max_seconds: 300 # cap on `requestClip(N)`
skip_leading_black: true # anchor the timeline at the first real frame
video_track: null # auto-picked when only one video track exists
audio_track: null # auto-picked when only one audio track exists
recording_dir: null # write chunks here instead of a fresh temp directory
video:
codec: h264 # h264 or h265
preset: veryfast # encoder speed/quality preset
crf: 23 # constant rate factor. Lower is higher quality.
target_width: null # lock the encoder to a fixed width (scales input)
target_height: null # lock the encoder to a fixed height (scales input)
audio:
codec: aac
bitrate_kbps: 128
```
`REACTOR_RECORDINGS_DIR` in the environment does the same job as `recording_dir`, for a deployment
that picks the directory at run time rather than at authoring time.
A few of these are worth a closer look:
* **`chunk_seconds`** controls how "live" clips feel. The runtime can only serve a clip whose tail
chunk has finished writing, so smaller values reduce the cold-start delay between `requestClip(N)`
and the manifest becoming playable. The default of 4 s gives a tail lag of roughly
`chunk_seconds + 1 s`.
* **`target_width` / `target_height`** lock the recorded resolution regardless of the frames your
model produces. Use these when your output resolution can change at runtime, for example a
WebRTC-driven source whose bandwidth estimator ramps the resolution up over the first few seconds.
Without a target, the recorder would lock to the first frame's size and rescale the rest.
* **`skip_leading_black`** anchors the timeline at your model's first real frame, so a clip's
markers and its bytes share an origin rather than counting from the moment the session opened.
## Capturing clips from the Demo Frontend
The fastest way to confirm recording works end-to-end is the
[Demo Frontend](https://reactor-sandbox.vercel.app/). When `recording.enabled: true` is set on your
model, the sandbox's **Capture** panel becomes interactive:
Set `recording.enabled: true` in `reactor.yaml` and start the runtime:
```bash theme={"theme":{"light":"github-light","dark":"github-dark-high-contrast"}}
reactor run
```
The runtime writes chunks to a fresh temp directory inside the container at session start. Chunks survive reconnects within the same `reactor run` invocation but are reset whenever the container restarts.
Visit [reactor-sandbox.vercel.app](https://reactor-sandbox.vercel.app/), pick **Local model**, and
click **Connect**.
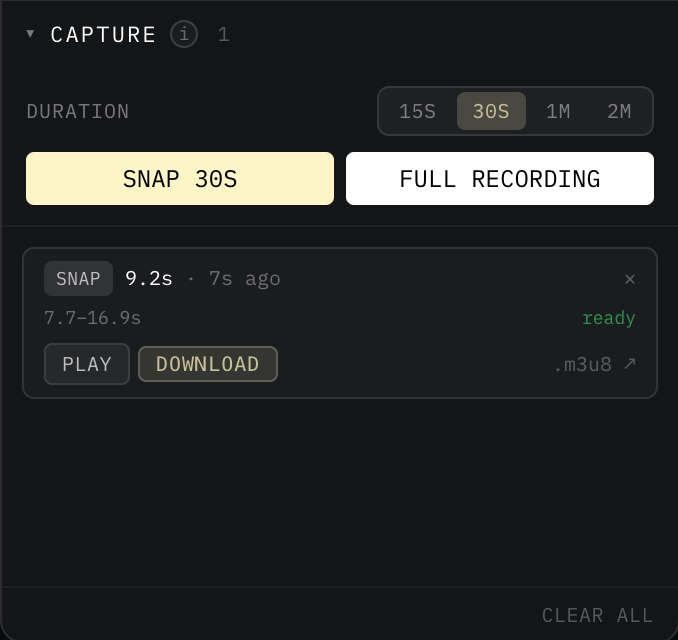
On the right side panel, the **Capture** section exposes two actions:
* **Snap N seconds**: grabs the last `N` seconds of the live session. Duration presets are 15 s, 30 s, 60 s, and 120 s.
* **Full recording**: grabs everything from the start of the session up to now.
Each captured clip shows up in the panel with a **Play** button and a **Download** button. The download is a single MP4 you can play back or share.
 ### Integrating capture into your own client
When you're ready to ship recording in a real application, the
[Reactor JavaScript SDK](/sdk-reference/using-the-sdk) exposes the same two primitives as one-line calls
on the `Reactor` instance:
```typescript theme={"theme":{"light":"github-light","dark":"github-dark-high-contrast"}}
const snap = await reactor.requestClip(30);
const full = await reactor.requestRecording();
```
The SDK also ships drop-in React components for previewing and downloading clips (``,
``). The full guide, including how to authenticate downloads in production,
is in [Recordings](/concepts/recordings).
Once `recording.enabled: true` is set, the Reactor JS SDK exposes the full recording experience to
any client application: capturing clips, playing them back, downloading them as MP4, and rendering
the matching UI components. Application developers can build on top of these primitives without
touching your model.
### How long a clip stays fetchable
A recording is kept for five minutes after its session ends, which is long enough for a client to
pull a last snap, and then its directory is deleted. The live recording is never touched, however
long the session runs. Fetch one that has aged out and the clip endpoints answer `410 Gone`, so a
client that holds a URL across a long gap needs to handle that rather than assume the bytes persist.
## The recording lifecycle
The same `recording.enabled: true` setting works at every stage of your model's life.
Add the `recording:` block to `reactor.yaml` and run `reactor run`. The runtime writes chunks to a temp directory inside the container and serves them back from a local `/clips` endpoint on the same port as your model.
Commit the `recording:` block. There are no build-time changes to make. The recorder ships with
the runtime and is wired up automatically when `enabled: true`.
Reactor's compute plane allocates per-session storage and presigns chunk uploads. Clients hit the Coordinator's `/clips` endpoint with the same `Clip.playlist_url` they got back in dev. The SDK transparently rewrites it onto the production origin.
## Performance impact
Recording runs alongside your inference loop on a separate thread, so it never blocks or slows the
frames going to the client. Encoding happens in process, with no external binary to install or
shell out to. The encoder owns its own backpressure budget: if it ever falls behind, the recording
absorbs the loss, not the live stream.
## Next
Audio tracks, and how they stay in sync with video in a clip.
Another `reactor.yaml` knob that follows the same local-to-production lifecycle.
### Integrating capture into your own client
When you're ready to ship recording in a real application, the
[Reactor JavaScript SDK](/sdk-reference/using-the-sdk) exposes the same two primitives as one-line calls
on the `Reactor` instance:
```typescript theme={"theme":{"light":"github-light","dark":"github-dark-high-contrast"}}
const snap = await reactor.requestClip(30);
const full = await reactor.requestRecording();
```
The SDK also ships drop-in React components for previewing and downloading clips (``,
``). The full guide, including how to authenticate downloads in production,
is in [Recordings](/concepts/recordings).
Once `recording.enabled: true` is set, the Reactor JS SDK exposes the full recording experience to
any client application: capturing clips, playing them back, downloading them as MP4, and rendering
the matching UI components. Application developers can build on top of these primitives without
touching your model.
### How long a clip stays fetchable
A recording is kept for five minutes after its session ends, which is long enough for a client to
pull a last snap, and then its directory is deleted. The live recording is never touched, however
long the session runs. Fetch one that has aged out and the clip endpoints answer `410 Gone`, so a
client that holds a URL across a long gap needs to handle that rather than assume the bytes persist.
## The recording lifecycle
The same `recording.enabled: true` setting works at every stage of your model's life.
Add the `recording:` block to `reactor.yaml` and run `reactor run`. The runtime writes chunks to a temp directory inside the container and serves them back from a local `/clips` endpoint on the same port as your model.
Commit the `recording:` block. There are no build-time changes to make. The recorder ships with
the runtime and is wired up automatically when `enabled: true`.
Reactor's compute plane allocates per-session storage and presigns chunk uploads. Clients hit the Coordinator's `/clips` endpoint with the same `Clip.playlist_url` they got back in dev. The SDK transparently rewrites it onto the production origin.
## Performance impact
Recording runs alongside your inference loop on a separate thread, so it never blocks or slows the
frames going to the client. Encoding happens in process, with no external binary to install or
shell out to. The encoder owns its own backpressure budget: if it ever falls behind, the recording
absorbs the loss, not the live stream.
## Next
Audio tracks, and how they stay in sync with video in a clip.
Another `reactor.yaml` knob that follows the same local-to-production lifecycle.